BUR Section 2: Control Joints, Perimeters and Penetrations
BUR-2.1 Control Joints
BUR-2.1.1 General
- Roofing control joints are required to prevent structural movement or stresses within the roofing system from damaging a Built-Up Roofing (BUR) membrane.
- For new construction, for building additions and for re-roofing, control joints shall be installed between the new and existing roofing systems. The Warranty Certificate will only be issued on self-contained roof areas/sections.
- Two types of control joints are used for roofing, construction expansion joints and roof area dividers.
BUR-2.1.2 Construction Expansion Joints

- The building construction expansion joint is incorporated by the design authority when differential structural movement is anticipated. Fully adhered membranes shall incorporate an ARCA approved expansion joint at these locations.
*REVISED 2021-10
- Roofing expansion joints typically are of double curb/plate construction, fastened on opposite sides of the structural separation.
- For conventional BUR systems, the top of the expansion joint shall extend a minimum distance of 200mm (8”) above the finished roof surface.
- Drainage openings are not permitted through roof expansion joints.
BUR-2.1.3 Roof Area Dividers

- A roof area divider is incorporated to divide the roofing system into manageable sections and to protect the membrane from stress related damage.
- For BUR membranes, roof area dividers are required where membrane stress points are likely to occur, such as at changes in roof deck direction or deck construction type.
- For conventional BUR systems, the top of the roof area divider shall extend a minimum distance of 200mm (8″) above the finished roof surface.
*REVISED 2010-06
- Where the roof system drainage slopes away on both sides of the roof area divider with a minimum slope of 1:50 (1/4″/ft.), the roof area divider height may be reduced to a minimum distance of 75mm (3″) above the finished roof surface.
*REVISED 2016-01
- Roof area dividers may be of single or multi-plate construction and shall be fastened to the roof decking to prevent displacement.
- Roof area dividers shall be installed so that the maximum dimension of the BUR membrane does not exceed 46.0m (150 ft.) and shall be spaced so that the enclosed membrane section does not exceed approximately 1394m² (15,000 ft²) in area.
- Membrane level drainage openings are not permitted through roof area dividers. Where drainage is required through area dividers, drainage openings shall be installed no lower than the top of the cant.
BUR-2.2 Perimeters
- To receive a Warranty Certificate, the minimum perimeter parapet height for a conventional roof design is 75mm (3”) above the finished roof surface.
- The top surface of the perimeter parapet wall shall be sloped towards the roof when the width of the parapet is greater than 100mm (4”). The top of the parapet wall must have wood blocking installed which is capable of providing holding power for nails and/or screws used to secure the metal flashing.
- Gypsum board is not an acceptable substrate for the interior (roof side) vertical surface of a perimeter parapet wall.
- A gravel stop perimeter detail is not accepted for Warranty Certificate issuance.
BUR-2.3 Roof Penetrations
BUR-2.3.1 General
- Where permitted and when installed in accordance with the ARCA Warranty Ltd. Roofing Application Standards, BUR membrane penetrations may be waterproofed with gum boxes, metal flashings or curbs.
- Specialty devices designed for this purpose shall be pre-approved prior to installation.
BUR-2.3.2 Curbs

- Curb tops shall extend a minimum distance of 200mm (8”) above the finished roof surface.
- Curbs may be of wood or metal construction and shall be mechanically fastened to the structural decking. Curbs shall be insulated.
- Prefabricated metal curbs shall be manufactured with no open corners.
- Metal curb tops shall be designed to provide a minimum 50mm (2”) counter flashing overlap.
- Exposed penetrations through curbs shall be placed nQQo lower than 200mm (8”) above the finished roof surface.
*ADDED 2010-06
BUR-2.3.3 Plumbing Vent Flashings

- Plumbing vents penetrating the roofing system, that are not curbed, may be waterproofed with a lead flashing, a conical one piece aluminum flashing or a pre-approved specialty device designed for this purpose.
*REVISED 2016-08
- When leads are specified, the lead sheet shall be sized to extend a minimum distance of 150mm (6”) over the surrounding primary membrane. The underside of the lead shall be cleaned to provide proper adhesion and set in a bedding of plastic cement over the primary membrane. The top surface of the lead shall be primed with compatible asphalt primer or plastic cement. The lead flashing shall be stubbed and caulked to the vent stack hub with oakum and plumbing sealant.
- Spun aluminum vent flashings, when not curb mounted, shall extend a minimum distance of 200mm (8”) above the primary membrane surface, and shall have a minimum of 100mm (4”) wide flange. The flange shall be set in a bed of plastic cement and the top surface cleaned and primed to ensure proper adhesion of the membrane flashing.
*REVISED 2016-08
- When curb mounted, the curb shall be sized so the base flashing overlaps and extends down over the membrane flashing a minimum distance of 50mm (2”) on all sides. The plumbing vent flashing shall be mechanically fastened to the curb on each side. Do not place fasteners through the horizontal surface.
- Where vent extension pipes are required, the base of the extension pipe shall be sealed into the vent stack hub. The interior of the plumbing vent flashing shall be insulated to reduce condensation.
*REVISED 2014-02
- Seal the junction between the base of the neoprene collar and the horizontal surface of the aluminum vent flashing with a compatible caulking.
*REVISED 2014-10
BUR-2.3.4 Jack, Ventilator And Gooseneck Flashings
- Roof jack, ventilator, and gooseneck flashings may be supported at membrane level or may be curb mounted.
*REVISED 2016-08
- When installed at membrane level, the flashing may not exceed 356mm (14″) in diameter or on a side. Each flashing shall incorporate a one piece base flange not less than 100mm (4″) nor more than 200mm (8″) in width. A flashing sleeve/cone shall extend not less than 200mm (8″) nor more than 300mm (12″) above the base flange. For gooseneck flashings, the minimum flashing height shall be measured to the throat of the bend. The sleeve connection with the base flange shall be soldered. All other seams, including gooseneck segments, shall be soldered/welded water tight.
- The base flange shall be set in a bedding of plastic cement placed over the primary membrane. The top surface of the flange shall be cleaned and primed to ensure the proper adhesion of the membrane flashing.
- When curb mounted, the base flange shall be sized to over lap and extend down over the curb base flashing a minimum distance of 50mm (2″) on all sides. The flashing shall be mechanically fastened to the curb on each side. Do not place fasteners through the horizontal flange surface.
BUR-2.3.5 Gum Boxes
- Rigid service lines shall be waterproofed using gum boxes.
*REVISED 2016-01
- Only armoured, thermoset-insulated or thermoplastic-insulated flexible service lines are permitted and shall be contained within a curbed enclosure or gum cup. The top 50mm (2”) of the gum cup shall be filled with two-part pourable sealer and the flexible line must be supported until the sealer has cured.
*REVISED 2016-06
- For new construction, gum boxes shall be of one-piece construction incorporating a minimum 100mm (4”) wide continuous horizontal flange with no open corners. Gum box sides shall be sealed and shall extend a minimum distance of 100mm (4”) above the primary membrane surface.
- The gum box shall be packed with oakum or other material to contain the sealer. The gum box shall be filled with a minimum 50mm (2”) thick layer of rubberized asphalt sealer or a pourable sealer and left crowned to shed water. Plastic cement is not permitted to fill gum boxes and shall not be used for this purpose.
- When re-roofing, gum boxes may be of a two piece construction provided there are no openings when installed and the rubberized asphalt sealer is contained.
- When more than one service line occupies a gum box, a minimum separation distance of 25mm (1″) shall be maintained between each service line and the gum box sides.
*REVISED 2016-01
- Three sided gum boxes require minimum 100mm (4″) flanges attached to the parapet wall and must be waterproofed with membrane flashing.
*ADDED 2016-01
BUR-2.3.6 Fall Arrest Anchors
- ARCA Warranty Ltd. assumes no liability relative to the supply and installation of fall arrest anchors.
- The Warranty Certificate does not include warranty of the fall arrest anchor system or its performance except as it relates to the watertight integrity of the roof membrane flashing seal around anchor flashings.
- ARCA Warranty Ltd. recommends that a professional structural engineer, licensed in Alberta, design the fall arrest anchor system. Installation, drawings, specifications and conformance to current building and safety codes shall be included in the professional engineer’s scope of work.
- Fall Arrest Anchors shall be waterproofed to ARCA Standards. Deck flanges shall not be fabricated less than 100mm (4”) nor more than 200mm (8”) in width.
*ADDED 2016-06
BUR-2.3.7 Roof Mounted Photovoltaic Equipment
- Enclosed roof sections that include photovoltaic equipment shall be independently drained and shall have positive drainage with a minimum slope of 1:50 (2%).
- The total area of roof mounted photovoltaic equipment shall occupy no more than 50% of the total roof area.
- Only rack-mounted photovoltaic systems secured directly to the structural roof deck will be approved when installed in accordance with ARCA Roofing Application Standards.
- Accessibility to roofing components shall be incorporated into the photovoltaic equipment design.
- A minimum clearance of 3000mm (10′) shall be provided around the perimeter of the roof area.
- A minimum clearance of 1200mm (4′) shall be provided between rows of photovoltaic arrays.
- A minimum clearance of 1200mm (4′) shall be provided to access all roof penetrations. There shall be a minimum 1200mm (4′) clearance on all sides of each roof penetration.
- A minimum clearance of 300mm (12″) shall be provided beneath the photovoltaic equipment to permit installation of the roofing system. Equipment supports shall be designed by a structural engineer and shall conform to the Alberta Building Code.
- Roof Warranty coverage of this section applies to commercial buildings for leak repairs on roof systems for five (5) or ten (10) year terms only. The cost to remove and replace the photovoltaic equipment to facilitate access to the roof membrane for investigation and repair of workmanship related leaks is not included and is the responsibility of the building owner.
*SECTION 2.3.7 ADDED 2017-08
BUR-2.4 Roof Drains
BUR-2.4.1 General
- The Warranty Certificate does not include warranty of the roof drainage system except as it relates to the watertight integrity of the roof membrane flashing seal around the drain assembly.
- Provision for emergency drainage is recommended in all instances and is a requirement when control flow drains are incorporated into the roof drainage system.
BUR-2.4.2 Cast Drains
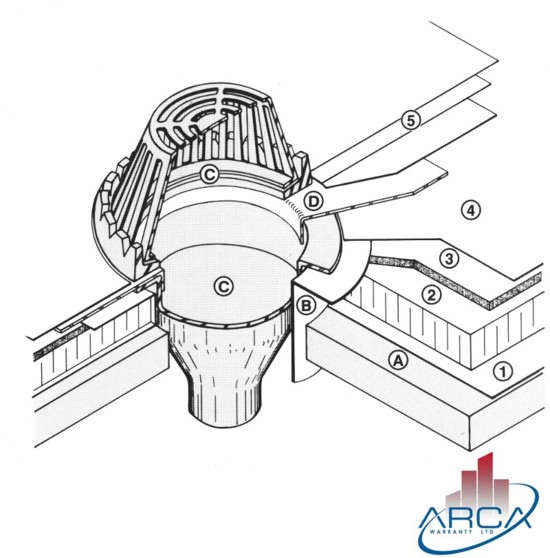
- The Warranty Certificate requires that a minimum 25 kg/m² (5 lb./ ft.) lead sheet flashing be used with cast drain assemblies. The lead flashing shall be sized to extend over the primary membrane a minimum distance of 150mm (6”) beyond the outside perimeter of the drain hopper flange. The lead shall extend a minimum distance 25mm (1”) beyond the inner edge of the clamping ring, used to secure the lead to the drain hopper. The lead flashing shall be set in a full bed of plastic cement and the top surface shall be cleaned and primed to ensure proper adhesion of the membrane flashing.
- The top hopper flange of the roof drain must be approximately 12.7mm (1/2”) below the surface of the primary membrane.
- Alternatively, a cast drain may be flashed and sealed with a sand surfaced, polyester reinforced SBS Modified Bituminous membrane in lieu of a lead sheet. The minimum size of the membrane reinforcement ply shall be 762mm square (30” x 30”), centred over the drain, and fully adhered to the top of the 4-ply membrane and drain hopper flange with compatible elastomeric mastic. The SBS membrane reinforcement ply shall be trimmed to the edge of the drain bowl. The drain clamping ring shall firmly set the waterproof seal to the drain hopper flange.
*ADDED 2012-11
BUR-2.4.3 Retrofit Drains
- Retrofit drains may be used for roof replacements (re-roofing) when cast drains are not practical. Retrofit drains shall be of spun aluminum or copper construction, with a minimum 100mm (4”) wide flange. The flange shall be set in a bed of plastic cement and the top surface shall be cleaned and primed to ensure proper adhesion of the membrane flashing. The drain size shall match that of the existing drain line. The retrofit drain sleeve shall incorporate a seal to prevent back flow from the existing drain line.
- Galvanized sheet metal drop drains shall only be used for exterior drainage locations, such as through an overhang. A minimum 100mm (4″) wide horizontal flange shall be soldered to the pipe sleeve and shall be set in a bed of plastic cement. The top surface of the flange shall be cleaned and primed to ensure proper adhesion of the membrane flashing.
BUR-2.4.4 Scupper Drains


- Scupper drains permit roof drainage through the perimeter building elements, such as parapets. Scupper drains may also serve as emergency over flow outlets. Scuppers may be open or through-wall type fabricated with or without an exterior hopper. When serving as primary drainage, the scupper shall be set so that the scupper apron is at or below primary membrane level.
- Scuppers shall be fabricated from minimum 26 gauge galvanized sheet metal. Scupper flanges must extend a minimum distance of 100mm (4”) over the primary membrane, cant face and wall opening. Sheet metal flanges shall be set in a bed of plastic cement. The tops of the flanges shall be cleaned and primed to ensure proper adhesion of the membrane flashing.
*REVISED 2010-06
- Through wall scuppers shall be four (4) sided to cover the upper scupper opening with sheet metal. The scupper opening shall be waterproofed in accordance with good roofing practice.
- Where control of drainage is required, the scupper assembly may include an exterior hopper and an attached down pipe.
BUR Section 1: Roof Decks
← Previous